Skip to product information
1 of 1

Ownens Corning

Owens Corning - Deckseal SA Base/Ply

Owens Corning - Deckseal SA Base/Ply

Regular price $118.75 USD
Regular price Sale price $118.75 USD
Sale Sold out

DELIVERY AND PICK UP INSTRUCTIONS

Make pickup and delievery options clear and concise here.

Storage

Owens Corning® DeckSeal SA Base/Ply self-adhered membrane should be stored at room temperature whenever possible. Do not store out of the box for prolonged periods, or in temperatures above 90°F (32°C). Do not remove the roll from the box until it is to be installed.

Precautionary Notes

Owens Corning Roofing recommends adherence to OSHA safety regulations. DeckSeal SA Base/Ply is designed to be installed on roof slopes between 1/4:12 and 2:12 and is to be applied directly to an exterior grade of Plywood or OSB when used as a base sheet in a 2 ply system, or Owens Corning® DeckSeal MA NailBase when used as the second ply in a 3 ply system.

Note: When installing DeckSeal SA Base/Ply, existing Plywood and/or OSB must be primed with either an asphaltic primer that meets ASTM D41 or a commercially available water-based acrylic primer. New plywood and DeckSeal MA NailBase do not need to be primed.

Note: Any primed substrate must be fully dry prior to installation. Refer to manufacturer’s recommendations. Plywood must be minimum 15/32 inch and OSB minimum 7/16 inch. Check local codes.

  • Apply only when the weather is dry and the ambient temperature is 45°F (7°C) and rising. Do not install when water in any form (i.e. rain, dew, ice, frost, snow) exists. All roof deck application areas must have positive drainage, continuous support, and be structurally sound to support the dead load requirements of the roofing system.
  • Apply only over clean, dry, dust-free surfaces.
  • Ensure installation of DeckSeal SA Base/Ply does not prevent or interfere with ventilation of the existing structure.

Failure to follow manufacturer’s application instructions may void product warranty. Plan the job so that the DeckSeal SA Base/Ply is covered by the DeckSeal SA SBS Cap the same day.


Application

Step 1

Sweep the roof surface to remove any dust, dirt, or debris prior to starting installation.

Step 2

Cut the DeckSeal SA Base/Ply to manageable lengths. Allow the cut sheets to relax prior to installation. Failure to allow the sheets to relax may result in wrinkles in the finished surface.

Step 3

Initiate starter course:

  • For a 2 ply (layer) system the starter course will always be 1/2 of the roll width.
  • For a 3 ply (layer) system the starter course will always be 1/3 of the roll width. (Cutting on one of the 12 inch lay lines will leave approximately 1/3 of the roll width.) If using SA Base/Ply as a second layer of a 3 ply system, the starter course for that layer will be 2/3 of the roll width.

The side lap seams of any 2 or 3 ply system layer should always be offset from the other layers.

Step 4

There are several ways to remove the release liner from the DeckSeal SA Base/Ply. One method is as follows: Lay the material flat on the roof aligned with the eaves edge at the lowest point on the roof.

Step 5

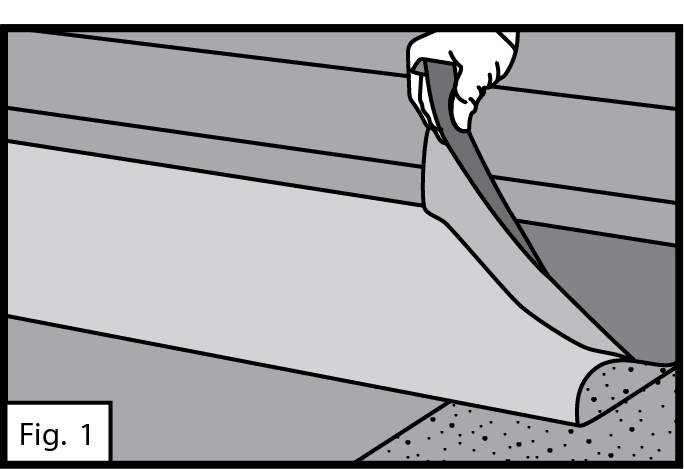
Fold the aligned sheet back half way exposing the release liner. See Fig. 1.

Step 6

Peel release film at a 45° angle in a constant motion, while firmly holding the half of the sheet that is in contact with the roof in place as the liner is removed. See Fig. 1.

Fig. 1

Step 7

Use hand or foot pressure to bond that portion of the sheet to the deck. If the split release liner remains on the opposite half of the sheet, flip the opposite half back and remove the remaining release liner. Use hand or foot pressure to bond that portion of the sheet to the deck. See Fig. 2.

Fig. 2

Step 8

If additional pieces are needed to complete the starter course, the end lap to be overlapped must be cut at 45° angles on the top and bottom corners. See Fig. 3. The top corner on the piece that is overlapping the previous piece must also be cut on the top corner at a 45° angle. See Fig. 3. The overlap is to be 6 inches. Remove the release liner and adhere as with the previous sheet.

Fig. 3

Step 9

Roll side laps and end laps firmly with a hand roller to ensure full adhesion. See Fig. 4. If necessary, hot air weld or apply modified asphalt flashing cement at 45° cuts or at end lap seams.

Fig. 4

Step 10

As each course is completed, roll the course with an 80 pound linoleum roller. Start at the center and work outward to remove trapped air. See Fig. 5.

Fig. 5

Step 11

When the eaves edge sections are completed, position the next course by overlapping the starter course by 3 to 4 inches. When installing each subsequent course stagger the end laps by 36 inches between courses.

Step 12

One method to remove the release liner from a full sheet of DeckSeal SA Base/Ply is as follows:

  1. Position the sheet on the 3 or 4 inch overlap lay line and roll the bottom of the sheet half way back to expose the split release liner.
  2. Peel release film at a 45° angle in a constant motion, while firmly holding the half of the sheet that is in contact with the roof in place as the liner is removed.
  3. When the release film has been removed, carefully roll the sheet back down and press into place.
  4. Roll the opposite half of the sheet back and remove the release liner using the same method as in step “B.”
  5. Roll the sheet back down and press firmly into place. 

Step 13

If additional pieces are needed to complete the course, the end lap corners are to be cut at a 45° angle as was done in Step 9. The overlaps are to be 6 inches.

Step 14

When the SA Base/Ply courses are complete roll the entire surface with an 80 pound linoleum roller.


Edge Metal Install

For 2 ply systems, the edge metal is installed directly over the base sheet. For a 3 ply system, the edge metal is installed over the second ply (layer).

  1. The edge metal must be a minimum 24 gauge galvanized steel or 0.040 inch formed aluminum, primed with either an asphaltic primer that meets ASTM D41 or a commercially available water-based acrylic primer.
  2. The roof flange of the edge metal should be 3 or 4 inches wide.
  3. Primed edge metal must be dry to the touch before membrane application.
  4. Install the roof flange of the edge metal over the base sheet at the lowest point on the roof. Nail the edge metal 4 inches on center in a staggered pattern. See Fig. 2.
  5. Install a minimum 8 inch wide strip of self-adhered DeckSeal SA Base/Ply over the edge metal leaving 1/2 inch of edge metal exposed at the eaves.
  • Pick Up
  • Delivery
  • Warranty

SKU:

View full details
  • FAST & RELIABLE DELIVERY

    RS Supply Inc ensures quick and dependable delivery of roofing materials. Our efficient order processing and logistics mean you get what you need promptly, keeping your projects on track with top-quality supplies.

  • LARGE INVENTORY

    Explore our vast inventory at RS Supply Inc, featuring a comprehensive range of roofing materials for all project types. Our one-stop-shop approach saves you time and hassle, catering to all your roofing needs under one roof.

  • GREAT SERVICE

    Experience exceptional service at RS Supply Inc, where our expert team is always ready to assist. We prioritize customer satisfaction, offering personalized advice and support to ensure your roofing project's success.

1 of 2

Contact form