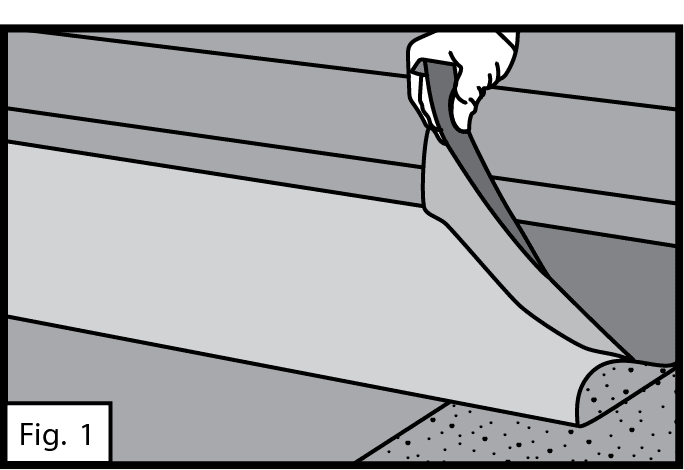
Skip to product information
1 of 1

Owens Corning

Owens Corning - Deckseal SA SBS Cap

Owens Corning - Deckseal SA SBS Cap

Regular price $118.75 USD
Regular price Sale price $118.75 USD
Sale Sold out

DELIVERY AND PICK UP INSTRUCTIONS

Make pickup and delievery options clear and concise here.

Storage

Owens Corning® DeckSeal SA SBS Cap should be stored at room temperature whenever possible. Do not store out of the box for prolonged periods, or in temperatures above 90°F (32°C). Do not remove the roll from the box until it is to be installed.

Precautionary Notes

Owens Corning Roofing recommends adherence to OSHA safety regulations.

DeckSeal SA SBS Cap is designed to be installed on roof slopes between 1/4:12 and 2:12 and is to be applied to an exterior grade of Plywood or OSB. Plywood must be minimum 15/32 inch and OSB must be minimum 7/16 inch. DeckSeal SA SBS Cap is to be applied directly to Owens Corning® DeckSeal MA NailBase or DeckSeal SA Base/Ply.

  • Apply only when the weather is dry and the ambient temperature is 45°F (7°C) and rising. Do not install when water in any form (i.e. rain, dew, ice, frost, snow) exists.
  • All roof deck application areas must have positive drainage, continuous support, and be structurally sound to support the dead load requirements of the roofing system.
  • Apply only over clean, dry, dust-free surfaces.
  • Ensure installation of DeckSeal SA SBS Cap does not prevent or interfere with ventilation of the existing structure.

Failure to follow manufacturer’s application instructions may void product warranty.


Application

Step 1

Sweep the roof surface to remove any dust, dirt, or debris prior to starting installation.

Step 2

Cut the DeckSeal SA SBS Cap to manageable lengths. Allow the cut sheets to relax prior to installation. Failure to allow the sheets to relax may result in wrinkles in the finished surface.

Step 3

The DeckSeal SA SBS Cap has a release film covering the selvage edge. The cap sheet should be installed with the selvage edge away from the eaves edge. The DeckSeal SA SBS Cap starter course is always installed full width.

Step 4

Lay the material flat on the roof aligned with the eaves edge at the lowest point on the roof.

One method to remove the release liner from the sheet of DeckSeal SA SBS Cap is as follows: 

Step 5

Fold the aligned sheet back half way, exposing the split release liner. See Fig. 1.


Fig. 1

Step 6

Remove release liner at a 45° angle in a constant motion, while firmly holding the half of the sheet that is in contact with the roof in place as the liner is removed. See Fig. 1.

Now that the release liner is removed, roll the sheet and press firmly into place.

Now roll the opposite half of the sheet back and remove the release liner using the same method as above.

If additional pieces are needed to complete the starter course, the end lap to be overlapped must be cut at 45° angles on the top and bottom corners. See Fig. 2.

The top corner on the piece that is overlapping the previous piece must also be cut on the top corner at a 45° angle. See Fig. 2.

The overlap is to be 6 inches. Remove the release liner and adhere as with the previous sheet.

Remove the side lap selvage edge release film on the area to be overlapped.

Do not remove the remaining release film covering the side lap selvage edge at this time.

Fig. 2

Step 7

The end of each roll of DeckSeal SA SBS Cap has a factory end lap selvage edge covered with a release film. Remove the end lap release film and press the overlapping sheet into place. See Fig. 3.

If necessary, during cool weather, hot air weld or apply modified asphalt flashing cement at all 45° cuts or at end lap seams and T-joints.

Where there is no factory selvage edge for end laps, the following methods can be used.

Fig. 3

HOT AIR WELDING

The area between the granular surface and self-adhesive backing can be heated with a hot air welding tool and rolled with a hand roller. This will ensure a water tight seal to the end laps. See Fig. 4.

Fig. 4

MODIFIED ROOF CEMENT

In lieu of hot air welding, the top layer can be set in a thin layer of modified asphalt flashing cement that is at least 6 inches wide and approximately 1/8 inch thick. Take care to prevent roof cement from oozing onto exposed area. If this should occur, sprinkle loose granules on the exposed asphalt immediately. See Fig. 5.

End laps must be a 6 inch minimum and fully adhered.

Fig. 5

Step 8

Press each sheet into place with firm, even pressure.

Step 9

Roll edges and all lap seams firmly with a hand roller to ensure full adhesion. After each course is completed roll the course with an 80 pound linoleum roller. Start at the center and work outward to remove trapped air.

Step 10

Blind back-nailing of self-adhered cap sheet membrane every twelve (12) inches at lap location is required on all slopes greater than 1 inch per foot (1:12). Use galvanized steel, stainless steeel or aluminum nails with a min. 12 guage shank and 3/8 inch diameter head. Owens Corning recommends that fasteners comply with ASTM F1667.

For the succeeding course, position the next sheet by completely overlapping the selvage edge of the previous sheet. See Fig. 6.

Fig. 6

Be sure to offset end laps on each subsequent course a minimum of 36 inches.

Only remove enough of the selvage edge release film on the preceding roll to complete each section of the install. Removing more film than is necessary may cause the exposed adhesive to stick to the release liner of subsequent sheets during alignment. See Fig. 7.

Remove release liner on succeeding course as previously described.

Step 11

After adhering rolls, it is required that uniform pressure be applied to the entire deck area using a 80 pound linoleum roller. Care must be taken to prevent injury when rolling, especially on sloped surfaces.

Fig. 7
  • Pick Up
  • Delivery
  • Warranty

SKU:

View full details
  • FAST & RELIABLE DELIVERY

    RS Supply Inc ensures quick and dependable delivery of roofing materials. Our efficient order processing and logistics mean you get what you need promptly, keeping your projects on track with top-quality supplies.

  • LARGE INVENTORY

    Explore our vast inventory at RS Supply Inc, featuring a comprehensive range of roofing materials for all project types. Our one-stop-shop approach saves you time and hassle, catering to all your roofing needs under one roof.

  • GREAT SERVICE

    Experience exceptional service at RS Supply Inc, where our expert team is always ready to assist. We prioritize customer satisfaction, offering personalized advice and support to ensure your roofing project's success.

1 of 2

Contact form